真是路途多揣,路漫漫其修远兮….
上次失败,这次换了正宗得Nvidia 3060显卡,显存8G来实验
操作系统是Ubuntu 22.04.5,搭配Nvidia 8G的显卡,用户是ubuntu,尽量用普通用户操作
先上去看:
nvidia-smi

root@ollama:~# nvidia-smi
Command 'nvidia-smi' not found, but can be installed with:
apt install nvidia-utils-390         # version 390.157-0ubuntu0.22.04.2, or
apt install nvidia-utils-418-server  # version 418.226.00-0ubuntu5~0.22.04.1
apt install nvidia-utils-450-server  # version 450.248.02-0ubuntu0.22.04.1
apt install nvidia-utils-470         # version 470.256.02-0ubuntu0.22.04.1
apt install nvidia-utils-470-server  # version 470.256.02-0ubuntu0.22.04.1
apt install nvidia-utils-535         # version 535.288.01-0ubuntu0.22.04.1
apt install nvidia-utils-535-server  # version 535.288.01-0ubuntu0.22.04.1
apt install nvidia-utils-550-server  # version 550.163.01-0ubuntu0.22.04.1
apt install nvidia-utils-570         # version 570.211.01-0ubuntu0.22.04.1
apt install nvidia-utils-570-server  # version 570.211.01-0ubuntu0.22.04.1
apt install nvidia-utils-580         # version 580.126.09-0ubuntu0.22.04.1
apt install nvidia-utils-580-server  # version 580.126.09-0ubuntu0.22.04.1
apt install nvidia-utils-590         # version 590.48.01-0ubuntu0.22.04.3
apt install nvidia-utils-590-server  # version 590.48.01-0ubuntu0.22.04.3
apt install nvidia-utils-545         # version 545.29.06-0ubuntu0.22.04.2
apt install nvidia-utils-565-server  # version 565.57.01-0ubuntu0.22.04.4
apt install nvidia-utils-510         # version 510.60.02-0ubuntu1
apt install nvidia-utils-510-server  # version 510.47.03-0ubuntu3
最高是590,那就装590的驱动
sudo apt install nvidia-driver-590

nvidia-smi
Tue Mar 17 17:28:07 2026
+-----------------------------------------------------------------------------------------+
| NVIDIA-SMI 590.48.01              Driver Version: 590.48.01      CUDA Version: 13.1     |
+-----------------------------------------+------------------------+----------------------+
| GPU  Name                 Persistence-M | Bus-Id          Disp.A | Volatile Uncorr. ECC |
| Fan  Temp   Perf          Pwr:Usage/Cap |           Memory-Usage | GPU-Util  Compute M. |
|                                         |                        |               MIG M. |
|=========================================+========================+======================|
|   0  NVIDIA GeForce RTX 3060        Off |   00000000:01:00.0 Off |                  N/A |
|  0%   32C    P8              7W /  170W |      24MiB /  12288MiB |      0%      Default |
|                                         |                        |                  N/A |
+-----------------------------------------+------------------------+----------------------+

+-----------------------------------------------------------------------------------------+
| Processes:                                                                              |
|  GPU   GI   CI              PID   Type   Process name                        GPU Memory |
|        ID   ID                                                               Usage      |
|=========================================================================================|
|    0   N/A  N/A            1107      G   /usr/lib/xorg/Xorg                        9MiB |
|    0   N/A  N/A            1183      G   /usr/bin/gnome-shell                      3MiB |
+-----------------------------------------------------------------------------------------+
接着装好torch
# 装uv
curl -LsSf https://astral.sh/uv/install.sh | sh

# 建项目目录
mkdir todo
cd todo

# 指定版本是python 3.12,这个稳定
uv venv --python 3.12
. .venv/bin/activate

# 安装torch
uv pip install torch torchvision torchaudio --index-url https://download.pytorch.org/whl/cu121
然后安装llama.app
# 安装依赖包
sudo apt install libssl-dev
sudo apt install nvidia-cuda-toolkit
sudo apt install gcc-10 g++-10

git clone https://github.com/ggerganov/llama.cpp

cd llama.app
# apt 安装的590其实版本比较旧,但是ubuntu 22.04自带的gcc11版本高了,导致cuda的编译认不出来高版本的文件
# 所以必须用低版本的gcc来编译旧版本的cuda驱动
cmake -S . -B build -DCMAKE_BUILD_TYPE=Release \
  -DGGML_CUDA=ON -DCMAKE_CUDA_ARCHITECTURES=86 \
  -DCMAKE_CUDA_HOST_COMPILER=/usr/bin/gcc-10

cmake --build build --config Release -j 8
那装好的llama.app目录在 ~/todo/llama.app/build/bin 下
再装LLaMA-Factory训练工厂:
git clone https://github.com/hiyouga/LLaMA-Factory.git

cd LLaMA-Factory
uv pip install bitsandbytes
uv pip install -e .[metrics]
准备教师训练数据,先只弄2条,跑通流程,然后再上3000条数据:
# 在 LLaMA-Factory/data 目录下,新建一个文件叫 opus_distill.json
# 内容如下:
[
{
"instruction": "请解释一下什么是黑洞,并给出一个生动的比喻。",
"input": "",
"output": "<think>\n1. 仔细分析请求:核心目标是解释黑洞,附加约束是提供生动比喻。\n2. 拆解概念:引力极强、逃逸速度大于光速、时空扭曲。\n3. 构思比喻:可以比作宇宙中的“单向漏斗”或“终极吸尘器”。\n4. 规划输出结构:先给出科学定义,再引入比喻,最后总结。\n5. 验证一致性:确保比喻没有严重扭曲物理事实。\n</think>\n黑洞是宇宙中引力极其强大的天体,其引力场强到连宇宙中跑得最快的光都无法逃脱。你可以把它想象成宇宙空间里的一个“单向无底洞”或“超级瀑布”。一旦水流(物质或光)越过瀑布的边缘(即事件视界),就只能往下掉,再也无法逆流而上。"
},
{
"instruction": "写一段 Python 代码来反转一个字符串。",
"input": "",
"output": "<think>\n1. 分析需求:用 Python 反转字符串。\n2. 评估可行方案:切片方法、reversed() 函数拼接、循环遍历。\n3. 选择最优解:Python 中最优雅且高效的方式是使用切片 `[::-1]`。\n4. 编写代码并添加注释。\n</think>\n在 Python 中,最简洁高效的反转字符串方法是使用切片特性。代码如下:\n\n```python\ndef reverse_string(s):\n return s[::-1]\n```\n这行代码的作用是从头到尾按步长为 -1 提取字符,从而实现反转。"
}
]
# 打开 LLaMA-Factory/data/dataset_info.json,加入上面的简单训练数据集
# 加入训练集
"opus_distill": {
"file_name": "opus_distill.json"
},
# 安装依赖
uv pip install bitsandbytes
# 开训,由于显卡内存有限,先练个小的模型
export HF_ENDPOINT=https://hf-mirror.com
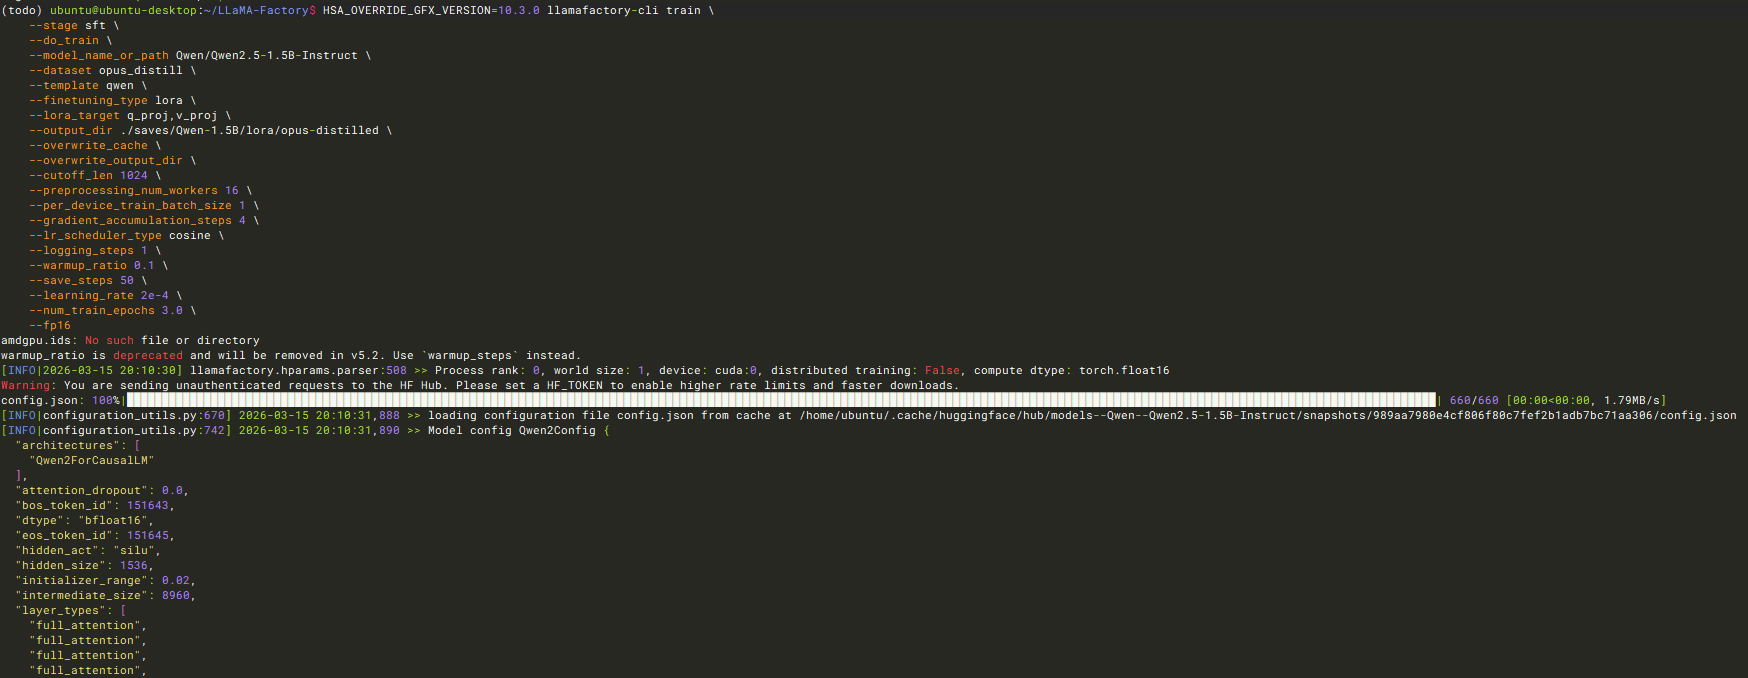
llamafactory-cli train \
--stage sft \
--do_train \
--model_name_or_path Qwen/Qwen2.5-1.5B-Instruct \
--dataset opus_distill \
--template qwen \
--finetuning_type lora \
--lora_target q_proj,v_proj \
--output_dir ./saves/Qwen-1.5B/lora/opus-distilled-3060 \
--overwrite_cache \
--overwrite_output_dir \
--cutoff_len 1024 \
--preprocessing_num_workers 16 \
--per_device_train_batch_size 1 \
--gradient_accumulation_steps 4 \
--lr_scheduler_type cosine \
--logging_steps 1 \
--warmup_ratio 0.1 \
--save_steps 50 \
--learning_rate 2e-4 \
--num_train_epochs 3.0 \
--bf16
上述命令跟A卡命令不同的地方:

1. 删除了 HSA_OVERRIDE_GFX_VERSION=10.3.0:N卡完全不需要这种欺骗系统的环境变量,直接原生态运行,干净利落。
2. 升级了精度:--fp16 改成了 --bf16:这是 30 系显卡(Ampere 架构)的终极福利!bf16(Bfloat16)不仅速度极快,而且动态范围更大,能彻底避免大模型训练中容易出现的“Loss 变成 NaN(梯度爆炸)”的问题。A卡 6700 是不支持原生硬件级 bf16 的,现在你可以尽情享受了。
3. 改了输出文件夹名:我把 --output_dir 加上了 -3060 的后缀,这样就不会把你之前在 A卡 上的心血覆盖掉。
成功后把训练出来的LoRA适配器权重和底模融合在一起,变成一个独立的模型
llamafactory-cli export \
    --model_name_or_path Qwen/Qwen2.5-1.5B-Instruct \
    --adapter_name_or_path ./saves/Qwen-1.5B/lora/opus-full-distilled-3060 \
    --template qwen \
    --finetuning_type lora \
    --export_dir ./models/Qwen-1.5B-Opus-Distilled-Merged-3060 \
    --export_size 2 \
    --export_device cpu
运行完毕后,你的 ./models/Qwen-1.5B-Opus-Distilled-Merged 目录下就会生成完整的 Hugging Face 格式模型文件

回到上层目录
cd ../llama.cpp/

# 我们之前为了装 ROCm 版本的 PyTorch,指定了 PyTorch 的官方下载源。uv 记住了这个源,并在里面找到了一个老版本的 transformers (4.56.1)。为了安全,它默认拒绝再去 Python 的公共官方源(PyPI)里寻找 llama.cpp 要求的最新版本 (4.57.1+)。
# 修复一下安装
uv pip install -r requirements.txt --index-strategy unsafe-best-match

# LLaMA-Factory 在导出合并模型时,把 tokenizer_config.json 文件里的 extra_special_tokens 字段存成了一个列表 (List)(比如 ["<think>", "</think>"])。但是,llama.cpp 底层依赖的最新版 transformers 库非常死板,它期望这个字段是一个字典 (Dictionary)
# 写个程序转换一下
python -c "
import json
path = '/home/ubuntu/LLaMA-Factory/models/Qwen-1.5B-Opus-Distilled-Merged/tokenizer_config.json'
with open(path, 'r', encoding='utf-8') as f: data = json.load(f)
if 'extra_special_tokens' in data and isinstance(data['extra_special_tokens'], list):
    del data['extra_special_tokens']
    with open(path, 'w', encoding='utf-8') as f: json.dump(data, f, indent=2, ensure_ascii=False)
    print('✅ tokenizer_config.json 修复成功!')
"

# 合并模型
python convert_hf_to_gguf.py /home/ubuntu/LLaMA-Factory/models/Qwen-1.5B-Opus-Distilled-Merged-3060 --outfile qwen-1.5b-opus-full-f16.gguf

紧接着做量化,量化为 Q4_K_M, 将 F16(16位浮点)压缩成 4-bit 量化格式,不仅能把模型体积缩小一半以上,还能大幅降低运行时的显存/内存带宽压力。因为 1.5B 模型本身很小,这个压缩过程在 CPU 上几秒钟就能跑完。
./build/bin/llama-quantize qwen-1.5b-opus-full-f16.gguf qwen-1.5b-opus-full-q4_k_m.gguf Q4_K_M

完美,验证一下成果:
./build/bin/llama-cli -m qwen-1.5b-opus-full-q4_k_m.gguf -p "请解释一下什么是黑洞,并给出一个生动的比喻。" -n 512
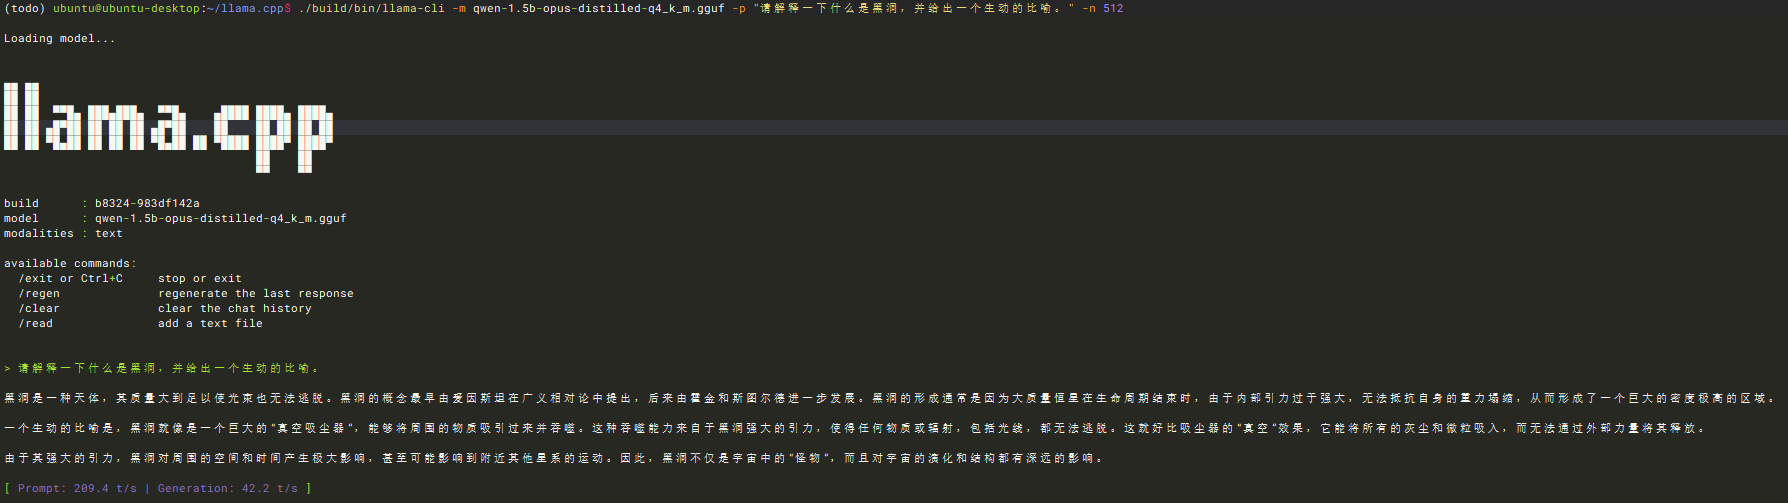
回答正确说明没啥问题了。
我们可以试试沉浸式对话模式:
./build/bin/llama-cli -m qwen-1.5b-opus-full-q4_k_m.gguf -cnv -c 2048
成功了,但是实际只有2条训练数据。
那把300条蒸馏数据给弄回来,真正训练一下
还得切回去pytorch,回到LLaMA-Factory目录下
然后去huggingface.co下载opus训练数据
需要转换一下,/LLaMA-Factory根目录下放置下载的这个文件,并且同目录写个prepare_data.py
import json
import os

input_file = "distilled_corpus_400k_with_cot-filtered.jsonl"
output_file = "./data/opus_full_3000.json"
formatted_data = []

print(f"⏳ 正在读取本地文件: {input_file}")

if not os.path.exists(input_file):
    print(f"❌ 找不到文件 {input_file}!")
    exit()

with open(input_file, 'r', encoding='utf-8') as f:
    for i, line in enumerate(f):
        if not line.strip(): continue

        # 只取前 3000 条数据进行训练(保护你的显卡寿命!)
        if i >= 3000:
            break

        row = json.loads(line)

        user_input = row.get("problem", "")
        thinking = row.get("thinking", "")
        solution = row.get("solution", "")

        # 核心魔法:把 thinking 包裹进 <think> 标签,然后接上最终答案
        if user_input and solution:
            if thinking:
                assistant_output = f"<think>\n{thinking}\n</think>\n{solution}"
            else:
                assistant_output = solution

            formatted_data.append({
                "instruction": user_input.strip(),
                "input": "",
                "output": assistant_output.strip()
            })

with open(output_file, "w", encoding="utf-8") as out_f:
    json.dump(formatted_data, out_f, ensure_ascii=False, indent=2)

print(f"✅ 完美!成功提取并格式化了 {len(formatted_data)} 条思维链数据!已保存至 {output_file}")
修正数据格式并且把数据集放进去:
# 修正数据
python prepare_data.py

# 打开 LLaMA-Factory/data/dataset_info.json,把你刚刚生成的新文件注册进去:
{
  "opus_full_3000": {
    "file_name": "opus_full_3000.json"
  },
  "opus_distill": {
    "file_name": "opus_distill.json"
  },
重新开始最终炼丹吧:
cd ~/todo/llama.app/build/bin

export HF_ENDPOINT=https://hf-mirror.com

llamafactory-cli train \
    --stage sft \
    --do_train \
    --model_name_or_path Qwen/Qwen2.5-1.5B-Instruct \
    --dataset opus_distill \
    --template qwen \
    --finetuning_type lora \
    --lora_target q_proj,v_proj \
    --output_dir ./saves/Qwen-1.5B/lora/opus-distilled-3060 \
    --overwrite_cache \
    --overwrite_output_dir \
    --cutoff_len 1024 \
    --preprocessing_num_workers 16 \
    --per_device_train_batch_size 1 \
    --gradient_accumulation_steps 4 \
    --lr_scheduler_type cosine \
    --logging_steps 1 \
    --warmup_ratio 0.1 \
    --save_steps 50 \
    --learning_rate 2e-4 \
    --num_train_epochs 3.0 \
    --bf16
这回跑了40分钟就炼成功了,真是不易